Now that you have installed Ubuntu on your system, you would like to have ROS installed on it as well. ROS will be the backbone of most of our application development process, and in this post, we will take a walk through installing ROS on a target system.
Method of Installation:
There are two main ways that we can install ROS:
-
By downloading the source and compiling it on the target system. This is not recommended unless you have quite some experience in building software this way. This was pretty much the only way to build ROS up till some years ago, but nowadays it is used mainly for custom targets, which need to meet some specific requirements. Nevertheless, if you want to take a look at this process, you can follow the instructions here.
-
ROS provides Debian-based packages for download and install, which reduces the hassle exponentially. We recommend this process if you are a beginner, and this is the process we will be highlighting in detail.
Note: The choice of ROS version largely depends on the version of Ubuntu you are running. In this post, our target system is running Ubuntu 16.04 LTS, hence we will install ROS Kinetic. Similarly, if your target system runs Ubuntu 18.04 you should install ROS Melodic, and for Ubuntu 20.04 you have ROS Noetic. The list can be found here.
Before we Begin
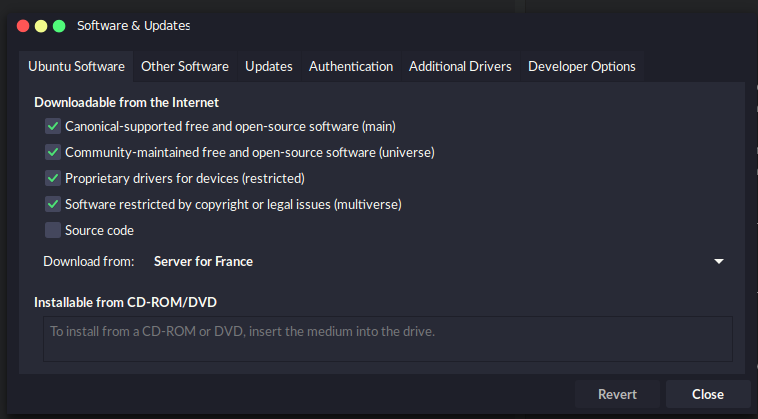
Before we begin, we should configure our Ubuntu repositories to be able to install software from different types of repositories. Generally, the default setting is “Main” - i.e., we can only use the software that is supported by Canonical and is open-source. Since ROS is not maintained by the Canonical group, we would want to extend our software repositories to include “Universe”, “Restricted”, and “Multiverse” as well. To do this, you can go to “Softwares and Updates” and select the options mentioned above.
Setup your sources list
Now that we are able to install software from (essentially) all sources, we would like to make our target system be able to accept software from ros.org. Open up a terminal, and run the following command:
sudo sh -c 'echo "deb http://packages.ros.org/ros/ubuntu $(lsb_release -sc) main" > /etc/apt/sources.list.d/ros-latest.list'
What you are doing here is adding the Debian package for ROS on your sources.list.d directory so that the package is able to add new sources without changing the rest of the configuration.
Setup your keys
Now, since we are really concerned with our privacy, we want to make sure that the ROS package we download are really sent by the OSRF, and not any fraudulent agency with malicious intent. So, we take the help of a key-server, which will generate a unique set of keys, one Public Key(what you are going to download on your target system), and one Private Key(that is held by OSRF). This creates a unique signature for apt-get to compare with while installing the package. Run the following command on the terminal:
sudo apt-key adv --keyserver 'hkp://keyserver.ubuntu.com:80' --recv-key C1CF6E31E6BADE8868B172B4F42ED6FBAB17C654
If you are using a proxy server, you might want to use curl instead of apt-get :
curl -sSL 'http://keyserver.ubuntu.com/pks/lookup?op=get&search=0xC1CF6E31E6BADE8868B172B4F42ED6FBAB17C654' | sudo apt-key add -
Install
Now we are finally ready to begin installation. Update your package index first by running the following command:
sudo apt-get update
Once the package list has been updated, you can now proceed to install ROS Kinetic. Here, you have a choice to make, largely based on what you are trying to achieve with your target system when you will use ROS. If you can afford the memory, it is honestly the best to always go for the Desktop-Full install, as this has all the functionalities ROS will have to offer to you. But mind you, this is a fairly large(~2GB) file. The differences in the choices are highlighted below:
-
Desktop-Full: Always recommended that you install this if you are a beginner, as this is basically ROS with all its features like multiple simulators, robot libraries, perception support and a whole lot. This is the best choice if you want to start development the moment after you finish installing ROS.
-
Desktop: The next best thing. A lighter version of ROS, with some functionalities stripped down. For a lower disk space you will get ROS, RViz, rqt, and some robot libraries.
-
ROS-Base: The lightest version of ROS out there. This is generally meant for edge devices, and contains the core ROS functionalities, the ROS build tools, and communication libraries. Ideal for extremely resource constrained devices. Keep in mind though, that with this version you will not get any form of GUI.
Once you have made an informed decision based on your requirements from ROS, you can install the packages by typing the command on your terminal:
sudo apt-get install ros-kinetic-desktop-full
Note: A gentle reminder once again that we are using ROS Kinetic because our target system is running Ubuntu 16.04. Had we been running Ubuntu 18.04 or 20.04, the commands would have been a little different.
You will note in the previous command that we have installed the desktop-full version. If you want to install the other versions, replace the desktop-full in the previous command by either desktop or ros-base such that the commands would look like this:
- Desktop:
sudo apt-get install ros-kinetic-desktop - ROS-Base:
sudo apt-get install ros-kinetic-ros-base
Congratulations! You have now successfully configured ROS on your target system. However, in order to start using the system, you would want to follow the next step, which does a little bit of book keeping.
Install dependencies
We have installed the basic ROS packages up till now, which will allow us to utilise the core ROS functionalities. However, we would want several other useful tools to be at our disposal when we work with packages of our own. To do that, we can run the following command to install the dependencies:
sudo apt install python-rosdep python-rosinstall python-rosinstall-generator python-wstool build-essential
We will make use of the rosdep tool to install system dependencies for the executables you may wish to compile. Having this tool makes it less of a hassle to link system dependent libraries and some key components make use of this tool. We have already installed python-rosdep in the previous section, we just need to initialize it, which can be done as follows:
sudo rosdep init
rosdep update
With this we are done with a complete installation of ROS. In the next section, we will see how to set up our target system to work with ROS.
Setup the Environment
With the completion of the previous step, ROS is now installed in our /opt/ros/kinetic directory. Now, you might find it convenient to auto-load your environment variables when you start a terminal. This is not always the best option, and we will see later why you might not want to do that in certain cases. However, assuming you are working with just the one installation of ROS, you will want to edit the .bashrc file such that it sources the /opt/ros/kinetic/devel.setup.bash script everytime you log in to a bash session. Alternatively, if you use ZSH, the file for you would still be in /opt/ros/devel, but you will be interested in the setup.zsh file. A quick and easy way to do this is as follows:
echo "source /opt/ros/kinetic/setup.bash" >> ~/.bashrc
source ~/.bashrc
Examples of cases when you would NOT want to follow the previous step:
The previous step makes the assumption that you are running only one distribution of ROS. If this is not the case, then it is a better idea to do the sourcing of the setup file manually, depending upon which distribution you would be working on.
Also if you are using ROS2 and ROS side-by-side, the same principle applies. Do not try and source them together in the bashrc file, as it will just be sourcing the setup file you mentioned last. A lot of hassle is saved when you simply source the setup file by hand.
This concludes the installation of ROS on our target system.
Troubleshooting your installation
A good way to check if everything was properly installed or not is to create a catkin workspace and build it. This will show that the catkin build tools, which we are going to use to build our system has been properly installed. We will keep things simple, by creating our catkin workspace in the home directory. To do this, you can open a terminal and run:
mkdir -p ~/ros/src
cd ~/ros && catkin build && exit
In doing this, we create our catkin workspace, which we are calling ros, adding a src directory inside it, and building the workspace.
Note: Instead of catkin build, you can also run catkin_make. But always stick to the command you are using, as these are not interchangeable.
If you get ERROR: catkin command not found, then you might want to install the python-catkin-tools package from the apt repository. This will generally solve the problem. You can install the package by typing the following command in the terminal:
sudo apt-get install python-catkin-tools
If everything goes well, you will get a prompt on your screen saying “all packages built successfully”, and that is your cue that the installation went fine. If you now go and check your catkin workspace, you will see that now you have four directories: build, devel, logs, and src. For now, we will only focus on the src folder.